
The Singer Express
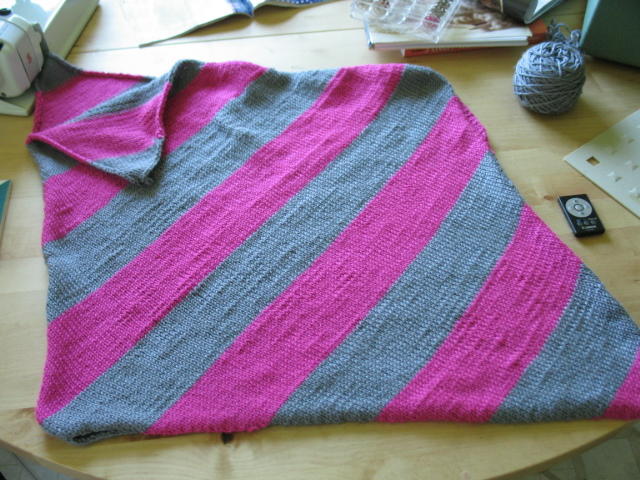 Here are the two pieces post seaming with the front facing us. Do you like how the stripes are biased and actually match? The corner, that for some reason I cut off, is the lower left (this is important!). First, let me just say that this pattern does not tell you how to finish this top, other than saying to follow the picture to seam it and attach all million pieces to it. Considering that knit.1 is "supposed" to be for beginners, I found this kind of perplexing. Really, no stitch names? Nothing? Alrighty then.
"Using photo as guide, align the front and back pieces along the inc'd edges to form the side seams. Four stripes for each side for the side seams. Sew the side seams." In the picture above, the increased edges are the very bottom and the right side (next to the remote). Now, if you sewed four stripes on the bottom and the right, where would your waist go? You would be essentially closing this off and making a pillow! I did not spend all this time knitting for a pillow. Luckily I had pinned both sides together, which helped me notice this mistake before the needle did any damage. So what are you suppossed to do?
Pin from the lower left corner up four stripes, this will become your left seam. Now, on the other side pin four stripes as well, but on the opposite end. Say what? Yep, use your decreased edge as your seam, but not from the opposite corner. Notice how the top right corner (left in the picture) is flipped down (i.e. not seamed). Disregard those first two stripes, rather start counting your four stripes after those two. You'll be happy you did this, because you'll actually be able to put it on! You may have to sew some more, but since I haven't attached all the strips yet I'm not completely sure about this.
Who would have thought you needed an opening to actually make it a tank top?
posted by yahaira at 10:37:00 AM
![]()
![]()


4 Comments:
Wow, I'm confused after reading about those weird Knit 1 instructions. What are all the other strips about?
the strips, oh so many strips. Those are the armholes, the straps/neck, and waist thingy. hopefully Ill be done with this madness soon enough!
Yahaira, love the colours in the tank and the way you got the biased stripes to match! Thanks for your comments on my River. It's now finished - photo on my blog!
You only need an opening if you have a head or a waist ;)
It looks great!
Post a Comment
<< Home